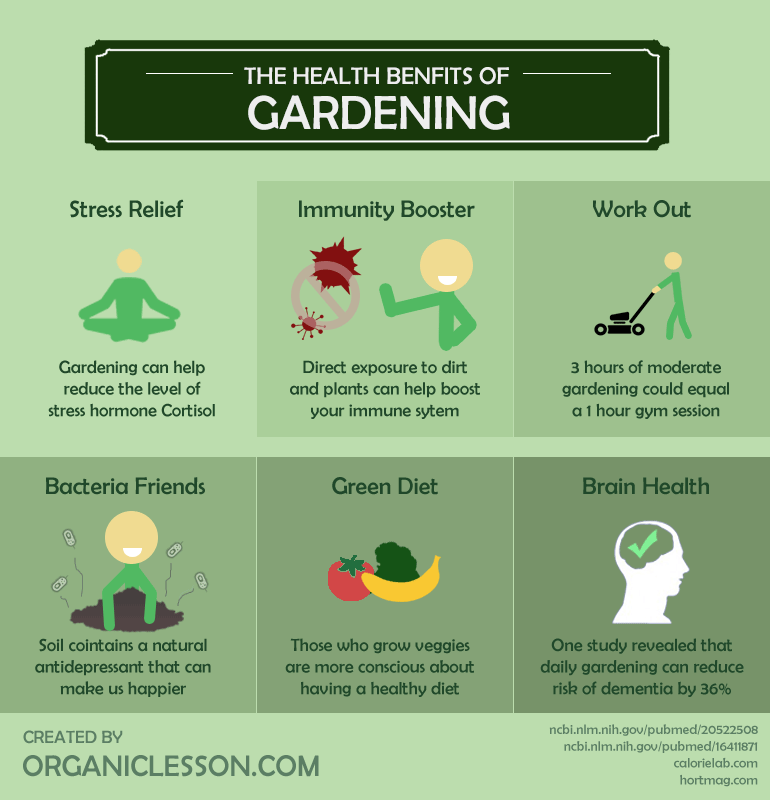
If you feel there is a gardener in you but haven’t got around to doing garden stuff, you are missing out on a very fulfilling hobby.
Take these wonderful benefits that gardening offers.
Problem is: You don’t have the faintest idea how to begin and go about your garden journey.
So, here we’ll guide you to all things gardening, one step at a time. Learn how to plan your first plot or pot of plants, discover great gardening ideas for beginners, and find simple tips and tricks to succeed in gardening.
As an enthusiast or established gardener, this comprehensive gardening resource serves as an additional reference and handy audit of your gardening work. Once properly laid out, these helpful tips will make growing your vegetables comfortably easier. Take that to mean having more time to host small backyard parties with your portable gas barbecue or trusty cooking grill to keep you company and your kids’ backyard trampoline to add to the fun!
Follow this blog series or browse through the chapters you feel most near to your needs.
Preparing the Garden and You
A. Things to Consider (Planning Stage)
B. Get Up Close with the Soil (Preparing the Foundation)
C. Understand the Season and Weather (What’s in Season)
D. Tools and Structures You’ll Need (Gathering the Essentials)
Dig In and Get Growing (With Recommended Plants for Beginners)
A. Start Planting
B. Vegetable and Herb Garden
C. Flower Garden
D. Fruit Tree Garden
Keep Up the Work
A. Maintaining Plants’ Basic Needs
B. Pests and Pest Control
C. Weeds and Weed Control
D. Plant Diseases and How to Prevent Them
Reap the Fruit of Your Labour
A. Harvesting
B. Preserving Your Harvest
C. Food Waste, No More
Best Practices in Gardening
A. Going Organic
B. Planting Systems to Increase Productivity
Specialty Gardens and Other Gardening Concepts
A. Garden Style Based on Focal Plants
B. Garden styles Based on Location or Space
C. Contemporary Gardening Methods
I. PREPARING THE GARDEN AND YOU
A. Things to Consider (Planning Stage)
Planning is a key to success. And so it goes with gardening. Most gardeners jump head on to the task and end up wasting resources. Proper planning helps eliminate or reduce wasted time and effort. And the best part is: It improves the result.
- Determine your goal. Why do you want to garden in the first place? Is it to fulfill your lifelong desire to grow a garden, try out something new and different, sustain your family with homegrown foods, produce plants for profit, or simply to go green and environmental? And what kind of fruits, vegetables, or trees do you like? How do you imagine your garden to be? Giving a thought about all of these will help quick start your gardening venture and motivate you to keep your plants in their best condition till you see them through to harvest.
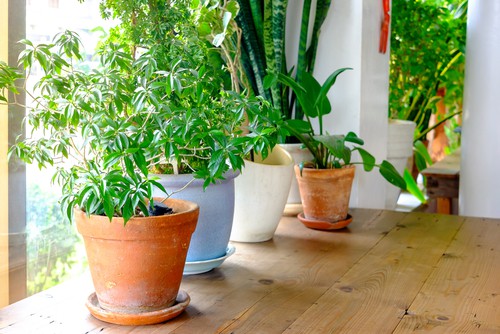
- Space for a garden. One common dilemma of would-be gardeners is the lack of space to plant in. But space is not a definite problem when it comes to gardening. It will simply determine the style that will make up your garden. If you’re creative and serious enough to get into this craft, you’ll find there is a lot of style options to garden according to the amount of space you have. Many types of fruits and vegetables can also grow in containers. If a backyard or ground soil is unavailable, you can turn your balcony into a paradise of potted plants. Only make sure that the container is of the right size for crop to grow.
- Time to spend tending to the garden. Gardening is time-consuming and effort-demanding. How much of your time and effort are you willing to spend on this endeavor? So you can manage the tasks at hand, it’s always advisable to start small and with easy to grow plants. Get the feel of the task then work way up from there.
- Plan out the location. Every type of plant has their own growing and environment condition needs. Planting them just about anywhere will greatly affect their growth. That is why planning out the location is of the essence. Here are the things you may need to consider:
- Air flow. Growing plants need to be protected from air and turbulence. Place hedges, fences, or screens to filter the wind and protect your plants in an open space.
- Sunlight. Vegetables and fruits love direct sunlight whilst a few salad green do well even in little hours of sun. Peas and other cool season plants grow best in shady areas. Assess your area and see how much sunlight or shade it gets during the whole day. Then position your plants accordingly.
- Moisture. Areas near massive walls or overhanging trees usually block rain, leaving the soil dry and unsuited for planting for some type of crops. Make sure to place an outdoor water source near the garden for convenient watering.
- Choose your style of gardening. As mentioned, the amount of space available shapes the design of your garden. But it is not the only determining factor in deciding how and where you’ll plant your favourite crops. It will also depend on the type of plant you will grow and personal preferences in building a garden. Common gardening styles include:
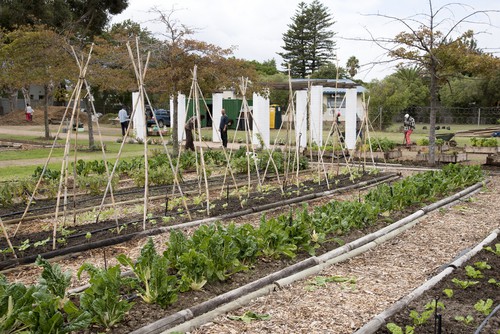
- Ground Bed – Dugged into an existing soil. Ground beds require at least 2 feet deep topsoil.
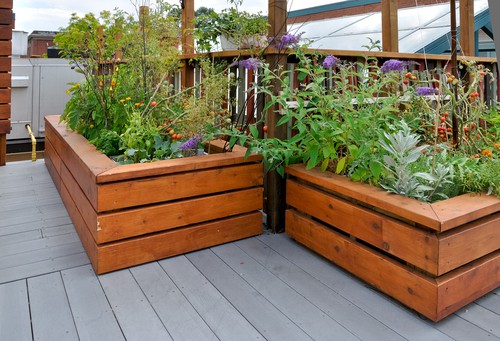
- Raised Bed – Above ground level, Has edgings like wood pallets, rocks, steel.Ideal for gardening on concrete. Invest in material and construction.
- Mounded Plots – layered organic matter over an existing topsoil. Contains added soil with green wastes and compost.
- Container gardens – running out of space, perhaps you’re living in an apartment. Containers and pot solutions, design to choose from. Easier to move around due to weather condition or to redesign your garden or patio.
- Vertical gardens – space saving solution, creative; can be used for container plants or climbing plants
B. Get Up-Close with the Soil (Preparing the Foundation)
Studies show that soil holds the key to a great garden. As a gardener, it is important you get to know your soil and provide it with the right nutrients, moisture, and air to produce a healthy garden and high-quality yields.
Different types of garden soil
- Sand – Loose soil and allows water to penetrate too quickly. Holds much air but have poor water retention. To make it ideal for gardening, improve with organic matter. Avoid if possible.
- Clay – Sticky particles and forms lump when squeezed together. Holds water well but becomes compacted when wet. Improve through regular aeration. Potatoes work fine in it.
- Loam – In between sand and clay, loam has the fine particles. Naturally contains organic matter, retains water and nutrients well. Perfect soil for edible plants.
Feeding the Soil
We commonly associate soil with dirt. Yes, it may be, but there’s so much more to it. Down lives microorganisms which give the soil its life and nutrient. It is these microbes that break organic matter, regulate soil temperature and ph balance, and aids in retaining water and nutrients. Feeding these creatures is feeding the soil and the plants that are rooted in it. And that leads us to one important aspect of gardening: Improving the soil.
Here are the keys to a healthy soil:
- Keep the pH level at a balance. pH is the level of acid or alkaline present in the soil. It affects the microbes living in the soil and the nutrients that will be available to the plant. Plants have different ph needs, but most prefer a neutral 6.5 – 7.5 ph level. Regularly check the pH with some soil testing kit.If the soil is too acidic, apply dolomite or lime and regularly mulch. If the soil is too alkaline, add elemental sulfur or mulch with coffee grounds.
- Supplement with nutrients and minerals. Soil has natural nutrients but often they get lost in run-offs or irrigation. Among these important soil nutrients are nitrogen, phosphorous, and potassium. These nutrients must be maintained. This is where fertilizers come in. Nitrogen-based fertilizers help, but it is likely to upset the natural balance within the soil. Organic fertilisers are preferable as they are safer for soil microorganisms and the plant. This include:
- Compost
- Well-rotten manure
- Mulch
- Grass clippings and dry leaves
- Sawdust and wood pellets
Composting
For the purpose of this great venture to gardening, we’ll look into the more organic and natural way of achieving a rich, fertile soil: Composting.
Composting is the process of supplementing the soil with nutrient-rich humus. It is an organic material made from decomposed plant parts and well-rotted manure. And the good thing is, compost can easily be done at home.
Benefits of compost
- Conditions the soil with the right nutrients and moisture.
- Beneficial microbes are at work, helping to aerate the soil and break down organic materials for plant use.
- Safer to the environment than chemical fertilisers.
What to compost
- Fruits and vegetable scraps
- Dry leaves
- Grass clippings
- Garden weeds
- Straw or hay
- Pine needles
- Seaweed and kelp
What not to compost
- Manure of animals that do not feed on organic food/materials
- Lawn clippings from pesticide-treated plants
- Plants parts from a diseased plant
- Meat and dairy products
Step by step guides to making your own compost
- Prepare the compost bin of your choice. This could be a wooden compost bin, straw bale, trench bin, rotary-style composter, or raised bed.
- Start piling up your organic materials, alternating the moist and dry materials. Food scraps and seaweeds are wet ingredients, whilst leaves and wood ashes make up the dry ones.
- Add green manure such as wheatgrass and grass clippings to aid in the processing of decomposition.
- Keep the nitrogen and carbon at a balance. A good compost uses one-third greens and two-third browns, creating more carbon than nitrogen.
- Mix and turn the pile occasionally with the use of a rake, pitchfork, or shovel. This helps aerate the soil and add oxygen.
- How long will your compost be ripe enough for use depends on the method of composting. Hot turn compost takes only about 20 days; worm bins take about 1-3 months; whilst No turn pile may need 3-12 months.
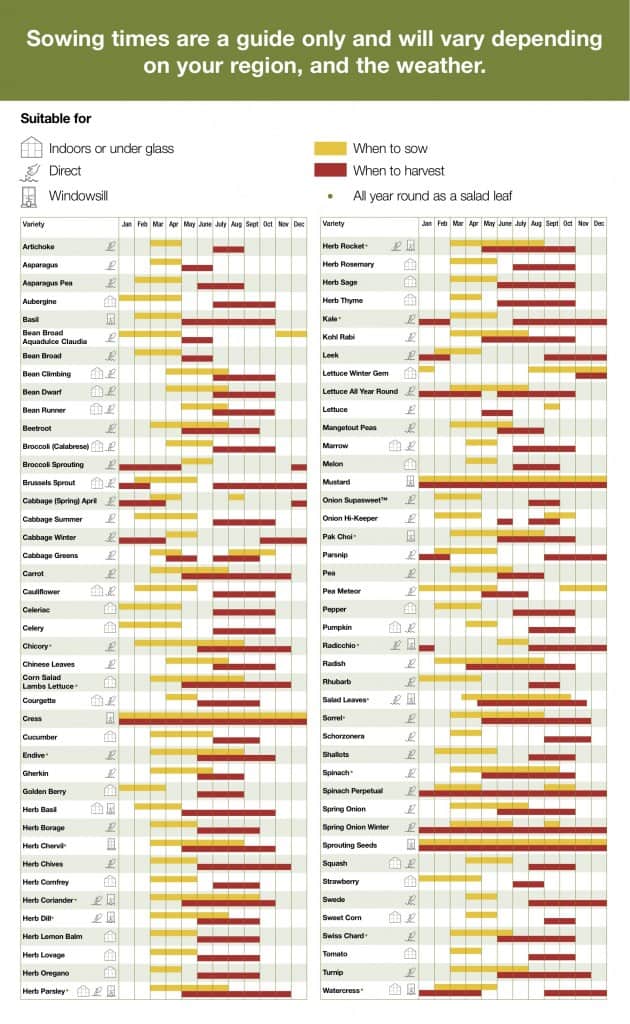
C. Understand the Season and Weather (What’s in Season)
A gardener’s essential skill in maintaining a good yield involves a basic understanding of the seasons and how it affects the growth of plants. Some plants thrive in cold weather; others love the warmth. The kind of weather also determines which seeds are best started indoors or directly in the garden.
Learning about when to plant and which type of plant to sow can be daunting for beginners. But a brief guide on seasonal plants and crop timing will pave the way for a better gardening start.
Seasonal categories of plants
- Short-season cool-weather plants. Fast-maturing crops that prefer cool temperatures include beets, lettuce, radishes, and peas. They are usually best sown directly into the garden, rather than started indoors, and are ready to harvest by early summer.
- Long-season cool-weather plants. Broccoli, cauliflower, and cabbage are cool-season crops that do better when set in the garden as transplants. They are started as seeds indoors in early spring and then transplanted a few weeks before the last spring frost. This gives them time to mature before hot weather arrives.
- Short-season warm-weather plants. Plants that like warm weather and develop quickly include beans and corn. They are also best sown directly into the garden after the last frost date, and when the soil has warmed and dried out from spring rains.
- Long-season warm-weather plants. Tomatoes, eggplants, and peppers require a long, frost-free growing season. These crops are best started indoors from seed and set in the garden as transplants.
Planting calendar (Sample from Thompson-Morgan.com.)
D. Tools and Structures You’ll Need (Gathering the Essentials)
Gardening requires elbow grease, which then need the right tools and materials to aid in the process. Having the necessary tools at hand will make the work less time consuming.
Essential gardening tools
- Spade – Used for breaking up soil, digging, shovelling, planting, and harvesting. It is basically an all-around tool. Invest in quality spade with a metal blade and wooden handle.
- Garden Rake – Comes handy in collecting fallen leaves, hay, and dead grasses off the lawn. Also used for loosening and levelling the soil as preparation for planting.
- Hoe – Some hoes are made to scrape the ground, to draw lines and till on it, to make water trenches or trails, or to cut down roots.
- Trowel – Mini-spades used for digging holes, weeding, and planting vegetables or flowers.
- Pruning Shears – Also known as secateurs, these are scissors designed for cutting plant stems. Shears are made of sturdy materials to make cutting and pruning of thick branches easier.
- Wheelbarrow – Wagons designed for carrying and moving around garden materials, soil, and garden products.
- Water hoses – Keep a good water system near your garden with water hoses.
Tips:
- As in all tools, proper handling is important to maintain a working place safe.
- Invest in quality tools and structures than the sub-standard ones.
- Keep a practical storage space for all your garden tools.
II. DIG IN AND GET GROWING (With Recommended Plants for Beginners)
A. Start Planting
Starting seeds
Ready to get planting? One the great way to start a plant is to grow it from seeds. Take note that each plant requires unique seed-starting processes and level of maintenance. These include a plant’s response to the frost or cold temperatures. Some plants are frost tender which needed to start indoors and grow to a small plant before planting to the garden soil after the last frost. As a beginner, it’s best to begin with easy to plant varieties such as tomato and basil. The Baker Creek Heirloom Seed has a definitive guide on raising seeds.
Step by step guide
- Find the right containers or pots. A seed tray is your most convenient seed planters as it has built-in drainage and handles. But any type of container will do such as yogurt cups, paper cups, or any household discards that are at least 2-3” deep and holed at the bottom for drainage.
- Get a good soil. Seeds and young plants also need a special choice of soil. Garden soil or re-used potting soil may contain microbes that are too harsh for a growing plant. If you are to make your own soil, carefully select and screen your garden soil and compost. Or you may opt for commercial potting soil with seed starting mixture.
- Plant in the seeds. Refer to each seed packet for instructions on how to plant the seed. Some may be sprinkled right on top of the soil, others may be pressed in gently exposing some parts to sunlight for faster germination, still others may need to be buried well enough. After placing your seeds, apply a few more soil mixture and a mist of water. Then cover the containers with plastic wraps to lock in the moisture and remove when the first sprout appear. Don’t forget to label your containers, too.
- Keep the warmth and light. To encourage sprouting, seeds need a right amount of heat so keep them in warm spots in your home like on top of your refrigerator. If a warm area is not available, buy seed heating mats. And when sprouts do appear, place the containers in a sunlit area such as the windowsill. Allow at least 15 hours of sunlight and 9 hours of rest in the shade.
Transplanting
When true leaves (3rd and 4th leaves to appear) sprout from your seedlings, it may be time to transplant them into a larger container or the garden bed. Transplanting will allow more room for roots to grow and nurture the seedlings.
Tips for moving or transplanting to container:
- Prepare a clean container and fill them with new potting soil.
- Choose the best-growing seedlings in the batch. Use a digging instrument when nudging out the young plant from their beds with as much roots as possible.
- Handle the stem or leaves very gently and position the plant firmly in its new container.
- Nurture your newly-transplanted plants with diluted fertilisers until you decide to plant them out.
Tips for moving or transplanting to garden bed:
- Make the transition from indoor to outdoor gradual. This is the hardening phase, where new plants are toughened to withstand the harsh outdoor condition.
- A week before transplanting, place them in a shaded area outdoors for a few hours and bring them back inside at night. Do this for a week, whilst exposing them to more and more sunshine and wind.
- Reduce also the amount of water and fertiliser during the whole week of hardening.
- When setting the new plants in the garden, water them in and cover the roots with loose soil.
Propagating a plant
Aside from starting seeds, new plants are created by taking a part of a parent plant to regenerate itself and from a new set. This results in a more genetically identical plant, which allows a gardener to grow the best species available.
- Cuttings. Cutting is a vegetative plant part such as stem, root, or leaf taken from a mature plant. Taking a cut usually needs sharp blade to reduce injury on the mother plant. Root cuttings are placed in sterile and well-moisturized rooting medium under a dark area. Stem and leaf cuttings, on the other hand, are placed in bright areas.
- Layering. Without taking any cuttings, new plants may grow by wounding one side of the stem or burying a branch or tip of a plant to the ground and letting it take roots. This method gives the new growing plant a secure water and food stock from the parent plant. Once the new plant has grown, it can now be moved to another area or container.
- Dividing. Dividing is the cutting or breaking up a cluster of suckers, crown, or clump into smaller segments containing a bud. Each of the segment is planted separately to form new individual plants. Perennial plants benefit most from dividing as it allows them to spread more in the garden.
- Grafting/Budding. Joining separate plant parts to grow as one is another method of propagating known as grafting or budding. This is best done on cultivars that do not root well. Through grafting or cutting, one or more new varieties grow out of existing fruit and nut trees.
Now let’s look into some of the most common home gardens and some varieties of plants in each type of gardens. A backyard or space at home may come in a single or combination of these types of growing plants.
B. Vegetable and Herb Garden
One of the great rewards for tilling the soil and planting crops is the food it provides on your table. Knowing the rise in demand and cost of agricultural products, you get to enjoy a year-round supply of fresh produce right in your backyard when to tend your own vegetable garden.
What vegetables to grow for beginners
The kind of vegetables to grow in your garden depends, mainly, on the kind of vegetables you’d love to eat and serve the family. But it’s also important to pick vegetables based on where you live, the season, and what you have access to in your area. For first-time gardeners, start with the easy to grow and steady producer of crops, including:
- Lettuce – There are several varieties of lettuce which you can grow at the same time. Gardeners love it for its high-producing yield even with limited space and low maintenance against pests and diseases. It can be harvested any time after true leaves form.
- Garlic & Onions – Easy to grow in pots or directly into the ground, thrive in fertile soil and warm area, and great food flavour enhancers for most kitchen recipes. These kitchen wonders usually take about three months to mature.
- Peas – Are crops that enjoy cool, moist weather. It can be sown directly into the ground with supporting structures for its climbing stems. Other than watering, peas need no extra attention. When harvested, the more they produce, so pick frequently as every other day.
- Basil – One of the tangiest herbs, basil has bushy foliage which easily grows from seed or transplants, in garden beds or containers. It thrives in the summer months so plan your it accordingly. Prune it regularly and harvest right when the plant starts to bud.
- Potatoes – Valued for its nutritious starch content, potatoes belong to staple foods which are worthwhile and so easy to grow. Plant the eyes directly into deep, well-drained soil under direct sunlight. It takes about ten weeks after planting for a new potato to get ready for harvest.
- Beans – Popular vegetable and one of the easiest to grow. It is best to sow bean seeds in the spring or after the last frost but may stop producing during the hottest point of summer. Like peas, beans produce more when frequently picked or harvested.
- Mint – All types of mint grows and spreads fast, forming lush green patches. When looking for a location to plant mint, choose a place for them to spread and where it receives a good amount of morning sun. Keep it in check by pinching the tips or pulling wayward runners.
Tips to achieve a bountiful produce
- Vegetables grow best in areas where they are suited. Choose plants accordingly.
- Pay attention to how you arrange your vegetables in bed. Allow some space for each plant to grow in a row and avoid overcrowding. Learn more about proper plant spacing in the following chapters.
- Grow more vegetables by going vertical. Use trellis, fences, or cages to support vining crops like peas, beans, and cucumbers. More about vertical gardening in the next chapters.
- Keep weeds off your vegetables by spreading 1-2 inch layer of mulch around each plant.
- For most vegetables, overwatering can be more harmful than under watering. Use a soaker hose and drip lines to irrigate slowly which allows roots time to absorb.
- Over-riped garden vegetables are an easy target for pests. Remove them as soon as possible.
- Take some time between a month and a full year after crop harvest before starting another batch of plants in a garden bed. This will help the soil rest and rejuvenate.
C. Flower Garden
Flower gardening is more of a passion and art, but starting this hobby can be overwhelming. There are several varieties of flowers to choose from, each with a unique way of tending and cultivating. Whatever the type of flower you want to grow, it is always considered as a rewarding and colourful addition to any space or landscape.
Types of flowers
- Annuals – Group of flowering plants that live and complete its cycle in one full year. It goes from seed to seed then dies off during one growing season. It has to be replanted to enjoy another blooming season. They are further grouped into hardy, half-hardy, and tender annuals. Examples include Coleus, Geraniums, Marigolds, Pansies, and Sunflower.
- Biennials – Plant category that usually takes two growing seasons to complete their life cycle. Foliage grows during the first year followed by its flowers and set seeds in the next season. Popular flowers falling under biennials are Poppy, Foxglove, and Wallflower.
- Perennials – Plants that live longer than two years. It starts as a seed every year and dies back to the ground but their active root systems allow the plant to grow back under the right condition. This includes Alliums, Chrysanthemums, Dahlia, Hydrangeas, and Tulips
Easy to grow flowers for beginners
- Sunflower – Can be started indoors or on direct soil, after the spring frost. Plant them in rows, about 6 inches apart in a shallow trench of 1-2 inch deep. Sunflowers are tough plants and will survive even with the absence of fertiliser. Depending on the variety, it matures after 80-120 days.
- Marigold – Easy to handle and grows quick. It thrives in full sun and accepts even a poor to average type of soil. Thin and transplant young marigolds for best results and water them down during periods of high heat.
- Geraniums – Hardy geraniums are low-maintenance blooms that come in different varieties and colours. They can be planted in areas with full sun and do not need to be watered regularly. Keep them healthy by removing dead flowers and stalks.
- Pansy – Can be started in any season, indoors or directly in the garden. It requires minimum care. They like well-drained soil full sun. Pansies will flower even more if spent flower heads are removed.
- Fuschia – Are easy to grow patio plants and best loved for their added colour and shape in flower containers. They can grow in bush form, upright, or trails. Pinch out the growing tips of fuchsia to promote bushier growth, water regularly to maintain moist, and feed them at least every few weeks in the summer.
D. Fruit Garden
Growing fruit in your backyard means having a supply of fruit varieties that are high in quality. You get to reap all the healthful qualities of fruits from vitamins and minerals to fiber and antioxidant properties. It also saves you from high-cost store-bought fruits.
Guide to choosing fruits to plant
- Fruits that are adaptable to your area’s climate.
- For beginners, start with the low maintenance and disease- or insect-resistant varieties such as apples, cherries, and persimmons.
- Choose the kind of fruits you love to eat and share.
Setting a fruit orchard
- Where to Plant. Fruit trees will be around for quite a long time so choose a dedicated location for this plant. Aside from good soil, the location must have good air and water drainage as well.
- The minimum size for a tree hole must be three times the size of the root ball. When the plant is settled on the hole, pile up the topsoil and well-aged compost.
- Plant regular fruit trees at least 20 ft apart from other trees. Dwarf fruit trees can be spaced at ten ft apart.
Fruit trees for beginners
- Apples – There are several varieties of apple, which thrive in cool to cold areas. It is advisable to grow at least two varieties for cross-fertilization. Your pruning job on apple trees takes after two years of growth. As it grows, short clusters of branch develop along the real branch, from which fruits bear. Apple trees take about 5-6 years before producing its first fruits and peaks by the tenth year.
- Cherries – Cherries grow in the same climatic condition as apples. Grow several varieties of sweet and sour cherries at the same time to aid in the fertilization. Cherries are pruned for easier picking and bigger yields. Pruning for maintenance consists of trimming out cross-branches and dead or sickly branches. When harvesting for eating, pick the fruit without its stems to lessen the stain of the tree.
- Pears – Pears need to be winter-chilled, but it can do well in poor soil as long as it is well-drained. Plant in different varieties for self-sterilisation. Prune your pear trees in the initial planting and avoid heavy pruning the succeeding years. Harvest pears before they are ripe. To be certain, pick the mature in size but just starting to turn colour.
Garden Tips:
- Start your garden with one or a combination of these gardens.
- Pick the easier ones to grow in each type of garden, then work your way up from there.
- Aim to grow less to achieve more. One of the common errors for beginners is planting too much too soon and way more than anybody could eat or want.
III. KEEP UP THE WORK
Setting up a garden is one thing, but keeping the plants steadily growing is another thing. Although a perfect start paves the way to a smooth gardening, proper maintenance is just as important to achieve a good harvest.
In this chapter, we’ll run through the basic maintenance needs of your plants once they are settled on the ground or containers. Learn about smart management techniques as well to keep that great harvest going through the seasons and back.
A. Maintaining Plants’ Basic Needs
1. Water. Like men, plants generally need water to survive. But even with watering, a few guides and tricks are worth considering to ensure water is optimally used to particular types of plants.
- The amount of water to give plants depends on the plant itself. Some are water-loving like melons and lettuce, others are naturally drought-resistant like mustard. Get to know your plants’ specific water requirement.
- Seeds may need only to stay moist for sprouting; seedlings and mature plants, on the other hand, may enjoy a splash of water.
- Consistent watering works best for most type of plants. Drought-resistant plants, may only need a touch of water a few times within long droughts.
- Early morning is the best time to water plants. That will give ample time to absorb the water before the heat of the day strikes.
- Use the most convenient watering tools or systems for your garden. Overhead Sprinklers covers much of the garden area when placed accordingly, but it can be pretty water-consuming. Soaker Hose is more efficient and low-maintenance, whilst your whole garden enjoys a steady and right supply of water. Or opt for traditional and reliable watering tool for most gardeners, watering cans.
2. Sunlight. During the planning stage, plants must have been located in areas where they receive a good amount of light – or shade – depending on their needs. Here are some tips to meet the light needs of plants:
- Check on your plants for signs of sunlight deficiency or too much heat. Plants that starts to droop, leaf edges burnt, and flower colours look faded may be exposed much to heat. If plant is not getting enough of light, it shows lanky stems, fewer flower buds, and sparse growth. Adjust them accordingly.
- Keep the space adequate between plants to ensure they each get sufficient amount of light.
- When plants are struggling against too much sun heat, install an arbor or plant a shrub near enough to cast shadow on the dry plant.
3. Mulch. Mulch is the undecomposed version of compost, used to improve the soil. But more than that, mulch also helps prevent the growth of weeds, retain water, prevents soil erosion, regulate temperature, reduce diseases. It is a must have multi-purpose, labour-saving product. It includes coffee grounds, leafmold, pine needles, bark, and shredded wood chips. Remeber these tips when applying mulch:
- Apply mulch after right after planting new, and once a year, particularly in spring or fall.
- Weed out and loosen the soil before applying at least 2” mulch.
- Avoid sprinkling mulch over the plant or on stems.
4. Fertiliser. In addition to mulch, plants are most happy when their soil is fed with organic fertiliser. Organic materials applied on soil eventually decompose and are consumed by plants. So it wouldn’t hurt to replace them regularly to keep up the nutrients. Here’s how:
- Replenish your soil with organic fertiliser as much as possible. If not, check on the commercially-produced fertilisers that best suit the nutrient needs of your soil and plant.
- Apply in a slow and steady fashion all throughout the season.
B. Pests and Pest Control
Gardens almost always come with tiny plant chewers and dwellers. That’s natural. And it does not always mean bad. Though some insects are considered a pest to the garden and to you, others prove to be more beneficial. So it’s best to get yourself acquainted with the real pests and how to control them. Plus, learn about other ways to work around garden pests.
Integrated pest management (three-pronged approach)
- Prevention. Discourage them from coming in the first place by pulling out any weak plants, debris, and weeds. Rotating crops each year will also avoid re-infestation.
- Observation. Check plants daily or weekly for any presence of pests. Keep a handy insect guide to help you recognize garden pests in your garden.
- Intervention. This is where natural remedies come in. Start by picking off the insects by hand. Then attract beneficial insects like ladybugs, lacewings, hoverflies, and praying mantis into your garden. If you are to use pesticides, opt for homemade or organic products.
Common pests and how to control them
- Aphids. Sap-sucking insects that feed on clusters of new plants. Heavy infestation of aphids will curl up and wilt leaves and cause stunted growth. Use organic fertilizer to get rid of aphids, and pinch off the infested leaves or other plant parts.
- Armyworms. Small insects that travel in groups or armies and consumes everything in their path. They feed on grasses then move up to feed on leaves and fruits. Avoid using pesticide against them. Invite their natural predators, instead, like birds and beneficial insects.
- Cabbage Looper. Also known as inchworms, they are the common and destructive pest among cabbage family and cole crops such as lettuce, broccoli, cauliflower, and kale. Once established, loopers can be difficult to get rid of, so act on them before they start an outbreak. Cover your plants with row covers to keep migrating moths from landing and laying eggs.
- Cutworms. Are moths that feed at night and burrow into the soil during the day. They commonly feed on plants stems, cutting them down eventually. Handpick these caterpillars at night especially after a rain. Beneficial nematodes released in the soil will attack the cutworms living underground.
- Flea Beetle. Small jumping insects found in home gardens early in the growing season. They can damage plants by chewing numerous tiny holes in the leaves and defoliate an entire plant. Beans, eggplant, corn, tomatoes, ands most seedlings are their favourite target. Row covers effectively prevents flea beetle attacks.
- Leafminer. Larvae of an insect family that feeds between the upper and lower surface of plants. They may not be threatening, but visible tunnels marked on the leaves reduces crop value and restrict plant growth. They infest cabbage, lettuce, and a variety of ornamental flowers, trees, and shrubs. Deal with them in natural, organic method.
- Slugs and snails. Some of the most troublesome pests found in home gardens. They thrive in damp, shady areas, even in well-mulched gardens. To avoid them, remove garden debris, lumber piles, and weeds and refrain from applying heavy layers of mulch. Handpick them out after sunset or install traps like cardboards to collect them at daytime.
C. Weeds and Weed Control
Weeds compete with your plants for water, nutrients, and even space to grow. They could end up ruining your plants and landscape all together. As in pest control, identify the kind of weeds that grow in your garden and deal with based on how and when they grow.
Types of Weeds
Annual Weeds
- Chickweed. Cool-season annual weeds that spreads over the soil, ruining the look of borders. Pull them up by hand or with hoe, preferably before flowering.
- Groundsel. Are native annuals present in any soil type. It occurs in great number and smothers young crop. Tackle them by hoeing the seedlings and removing the uprooted large plants to avoid the spread of its seeds.
- Hairy Bittercress. Broad-leaved weeds that annoy container plants, greenhouse plants, and railways. Regular hoeing will prevent it from flowering and shedding seeds. Carefully uproot them off the soil to avoid the seeds from scattering.
Perennial Weeds
- Dandelion. One of the most persistent weed. Its taproots are difficult to extract by hand, and cutting it with blade may not be effective. Use a hoe to remove it and spot treat with organic herbicide.
- Japanese Knotweed. Invasive perennials that grow rapidly and underground stems spread widely. They must be removed as soon as they’re seen by digging out regularly. Once established, they are much more difficult to deal with.
- Hedge Bindweed. Perennials with long climbing stems that swamps flowers and shrubs. Remove its rootstock to reduce its regeneration.
Managing Weeds
Weeds that grow in home gardens may be tackled in several ways depending on their strength and prevalence. This include:
- Prevent with organic weed preventers. Spray them around the plants to prevent weeds from germinating.
- Remove manually. This is the cheapest but labor-intensive method of getting rid of weeds with shallow-roots. Make sure to uproot the weed completely.
- Use garden tools. Hoes and weed pullers are common tools used for weeding. It is especially useful against deep-rooted and persistent weeds.
D. Plant Diseases and Control
Observing best growing practices thwarts most garden diseases and disorders. But, however good the circumstance is, diseases develop and find its way to fester your garden. So a little knowhow will give you an edge at controlling and treating these plant diseases. But when things starts to get out of hands, seek advice from the plant disease experts or pathologist.
Things you need to know
- Plant diseases shows several symptoms like wilting, rotting, moldy coatings, and the appearance of scabs and blotches.
- To minimize diseases, choose disease-free seeds or starter plants.
- Some diseases occur on certain types of plants. Choose varieties that are more tolerant to that disease, meaning they have the ability to overcome its effect to a certain degree.
- Keep your plants healthy and vigorously growing by keeping your garden clean, watering properly, and regularly applying fertiliser.
- When it comes to applying treatments, make sure you are treating the disease precisely. Choose treatment that is also convenient but suits your need.
Common garden plant diseases
- Leaf Spots. Caused by either fungi or bacteria. They look like a blotch on the leaves which eventually turns brown and fall. Fungus on spotted leaf flourish because of moisture and poor air circulation. So water the soil instead of the foliage and leave space between pots for good circulation. You can also apply organic treatment.
- Powdery Mildew. A fungal disease that forms white to gray powdery growth on the leaf surface. It affects most edible and ornamental garden plants including apples, blackcurrant, cucumbers, roses, and azaleas. Fungicides may help treat the disease but natural remedies are preferable like early pruning, mulching, and applying homemade cure.
- Club Root. Fungal infection of the cabbage-family, causing swollen roots and stunted growth. Its fungi live in moist and warm soil for several years. Buy brassica plants from clubroot-free sources and give it a healthy head start by raising the soil pH level with lime. If the soil is already affected by clubroot, discard the plants and the entire root system to prevent the spread of disease.
- Common Rust. a fungal disease that affects woody perennials and other mature plants. It results in rust-colored pores on the underside of leaves and stems. Rust fungi thrives in wet environment so avoid watering your plants. Destroy the infected leaves at the first sign of rust, and never use it for composting.
- Box Blight. A serious box disease caused by Cylindrocladium buxicola. It results in bare patches and brown leaves. Treatment includes sanitising or keeping the affected plant from destroying other plants.
IV. REAP THE FRUIT OF YOUR LABOR
One of the heartening part of gardening is when harvest time comes or the flowers come to bloom. You get to pick and enjoy the fruit of your day-to-day nurturing, at last. It’s a reward that never fails to thrill, whether you’re a beginner or expert at gardening.
But even with harvesting garden produce and picking of flowers, a lot of thought must also be considered. How do you know if a fruit or vegetable is mature enough to harvest? When is the best time to harvest? What if you harvest too much edibles for your family’s consumption? Can you preserve those produce for longer periods? How? Read on.
A. Harvesting
Learning when and how to harvest begins in identifying what stage of maturity is a vegetable or fruit at. Then be guided on how and when to pick your fresh produce.
Experts distinguish plants’ maturity stages as:
1. Mature. Fruit or vegetable is ready for harvest. Skin colour, shape, size, aroma, and leaf quality indicates maturity of some fruits and vegetable. These signs may be subtle and takes practice to get familiar with them.
2. Ripe. Edible part of the fruit or vegetable is fully developed in size but may not be ready for consumption.
3. Senescent. Natural degradation of a fruit or vegetable.
When to harvest your garden produce often depends on the specific plant you’re growing. It also helps if you kept track of your plant including the expected maturation date.
Here are more pointers when harvesting
- Leafy greens and some root crops are best harvested and consumed while they are at their youngest, most tender state. Edible seed-bearing part of a plant, on the other hand, tastes better when they are fully ripened.
- For most fruits, check the ripeness with a few fruit samples in terms of visual clues, taste, and texture.
- Cut and harvest flowers for display when they are starting to open.
- Handle the produce carefully when picking or harvesting. Hold fruits and vegetables firmly but twist them off the stems or soil gently. Use scissors if needed.
- Morning is the best time to harvest as water content in vegetables, fruits, and even flowers is still high.
- Come up with a picking strategy before you go on a harvest spree. Are you going to harvest everything at once, or harvest a few but more often?
- Watch out for signs of wilting or decay and remove these problem parts.
- Get your tools –fruit picker, baskets or carts, sharp knife or pruning shears, spade or shovel, and/or ladders– clean and ready.
- Prepare storage areas and containers, as well. Root crops do best in cool dark places. Some vegetables and fruits may sit on top of kitchen counters to rest and ripen. Cut flowers, on the other hand, must be taken indoors immediately and placed in vases or other containers.
B. Preserving Vegetables and Fruits
If you’re blessed with more than enough garden produce in a day, why not share it with other relatives, friends, or your neighbors? And if good harvest keeps coming, it’s time to do some preserving to last your food needs for months to come. Here are some easy-to-do preservation methods you can practice at home
1. Freezing. One of the easiest options to store your fresh fruits and vegetables is freezing. It requires very few equipment or skill, but can only hold the freshness of your produce for as long. Here are the simple steps in freezing your produce.
- Wash the fruits and vegetables thoroughly. Slice your fruits, if you like. Let them sit for a bit to reach room temperature.
- Lay them in a tray or covered containers and try to leave an inch of room from the lid to the top layer of the foods. If you’re using a food wrapper, let all the air out before freezing.
- Label the containers with the content and date of freezing to ensure that the earliest frozen foods are consumed first.
- If you want a long-term freezing, invest in deep freeze appliance to chill the food to at least 0⁰F.
2. Canning. Canning requires modest investment in materials or equipment. It also needs some understanding and practice in the method to save you from food poisoning that usually comes with canned foods. Tips in canning food at home:
- There are two methods of canning depending on the food. Acidic foods (4.6pH below) like most fruits and fruits jams or butters are canned through hot-water bath, in which food is sealed in jars, submerged in a pot of water, and brought to a boil according to recommended time. Low acid foods (4.6pH above) like fresh vegetables and some fruits are canned using pressure-canning method, in which food-filled jars are placed in a pressure canner that does all the trick, destroying heat-resistant organisms to as high as 240⁰F.
- Whichever method you use, make sure to clean the jars and lid. Wipe down the rims of your jar and lid to ensure they fit tight, which is vital to keep the food safe. Invest in canning jars that comes in various sizes to suit your canning needs.
- Most canned foods are salty, but you may or may not use all that sodium. Use canning salt over table salt, if you must.
- Check out canning recipes for each specific fruit and vegetable for best results.
3. Pickling. One of the oldest methods of preserving food is the use of salt and vinegar to inhibit the growth of bacteria. Pickling will prolong the shelf life of food to about 3 months and longer. Almost any vegetable can be preserved through pickling. Guides and tips in making pickled produce:
- Check out specific pickling recipes and follow the ratios to the letter, if possible.
- Use canning salt or pickling salt rather than the common table salt. White or cider vinegar with 5% acidity is also recommended.
- As in all method using jars as storage, ensure that the jars and lids are cleaned or sterilised.
- Store the jar in the refrigerator to preserve the pickles longer.
4. Drying. Also a common and old method of preserving food is drying. It takes out the moisture or all water content from the food to inhibit the growth of mold and bacteria, but some nutrients will be lost as months and years passed. Fruits, herbs, and seeds are commonly preserved through drying. Here are the methods and tools used for drying:
- Traditional drying is done under the 100⁰ heat of the sun in 3-4 consecutive days. It is most convenient to do in hot, arid regions.
- The more easier way of drying involves the use of commercial dehydrators which takes up several hours to days of drying foods completely.
- If you’re not into investing a food dehydrator appliance at home, conventional gas or electric oven will do. See some food preservation books for instructions in using your oven as dehydrators.
C. Food Waste, No More
Did you know?
- Out of the 6.7 million tonnes of wasted food in UK households, 40% is made up of consumable fruits and vegetables.
- The most common reason for throwing away fruits and vegetables is that they were mouldy (37%) and perceived to be ‘off’ in terms of appearance and texture (25%).
- Most of these “waste” are also thrown away as a result of not being used in time. Top fruits and vegetables thrown away whole and untouched include Potatoes at 5.1 million/day and Apples at 4.4 million/day.
So, how can we lessen the wastes on our garden produce?
- Refrigerate most fruits and vegetables to maintain freshness and extend storage life. Oranges and pears will last up to two weeks longer if kept in the fridge; Peppers, carrots, and tomatoes will last for at least a week. Also, practice other home preservation methods discussed above.
- Ditch the “ugly veg and fruit goes to trash” mindset. A lot of researches and campaigns have successfully proven and promoted ugly foods as a healthy food option. Embrace wonky fruits and vegetables and you help reduce food waste (and needless rejection) to a significant portion. Plus, these natural products don’t taste any different from perfectly-shaped produced.
- Sauces and soups are prepared not only from fresh vegetable or fruits but also from their scraps. So you can also prepare your own sauce and soup out of vegetable peels, skins, stalks and other discarded parts. Simmer these ingredients in a pan for a few hours, then let cool and store in the refrigerator until you want to make a soup or sauce out of this stock.
- If you’re keen on retaining quality produce, why not try to re-grow your best home-grown fruit or vegetable product? It is a frugal gardening trick that will save you a lot of food waste in the long run. And re-growing fruits and vegetables from scraps is so easy, even a kid can make a home project out of it.
- All parts of a vegetable and fruit waste, even when mouldy or ugly, can be used for composting. Store them in plastic bags in your refrigerator or in a securely lidded kitchen pail until you decide to mix them in your compost bin. To avoid the odour, empty the containers daily or cover the inside with a wet paper towel.
V. BEST PRACTICES IN GARDENING
A. Going Organic
Organic gardening defined
According to USDA, “organic” is something produced using sustainable production practices without the use of most conventional pesticides or synthetic fertilisers. Gardening organically means supporting the health of the whole garden system, from the plants being grown to the microbes in the soil.
How it started
Contrary to what most people think, organic gardening is not a new concept. It has been around for thousands of years, practiced by our ancestors in growing their own food. But soon people looked for undemanding planting methods, products that could kill whatever weed or pest, any shortcut to gardening success. And the sad part is, big industries cash in on these needs, introducing chemical pesticides, synthetic fertilisers, and other inventions.
Organic gardening was then embraced only by a few health conscious and green advocates. But continuous studies and campaigns for this natural approach gain traction. Now the concept bares an important role in almost every home and commercial gardens.
Why go organic?
Why not? Organic gardening is the closest to safe food and positive environment impact we can get. It keeps us from the threat of genetically modified foods and toxic products. We know exactly how our edibles were planted and what has gone into them. Having a homegrown plant makes us confident that the food we and our family eat is clean.
On the flip side – if it is a flip side at all – people view organic gardening as an expensive and labour-intensive approach. At some point, it is. But in the long run, using compost to enrich the soil or growing climate-appropriate plants prove to be more cost-efficient and worth all the trouble. And not to mention, organically-grown plants grow more vigorously and yield healthier fruits.
How to practice organic gardening
- Plant high-quality, certified organic seeds. You will find 100% organic seeds of different plant varieties from organic gardens and stores, even from your friendly organic gardeners. Once these seeds are purchased and grown, you can use the same variety to grow more organic plants.
- Prefer plants that are native and suited to your area’s’ climate. Plants that are well-adapted to your place’ condition thrive more healthily and need little amount of attention or boosters to keep them productive. Observe the plants in your local farmers’ market or contact your hardiness zones experts.
- Make your own compost. Compost is the ideal organic matter to feed your soil with. Made from equally organic ingredients such as grass clippings and kitchen scraps, compost can be made right in your homes. See chapter on Composting.
- Supply the soil with organic fertilizers. Aside from compost, supplement your soil’s nutrient needs with fertilizers made of animal manures, rock phosphate, and plant products such as seaweed. Also, agricultural lime raises soil ph level, as needed.
- Encourage beneficial insects to your garden to combat destructive pests. As discussed, beneficial insects keep pests population down without compromising plants and soil health. It includes aphid midge, damsel bugs, ground beetles, lady beetles, and lacewings. Encourage them by planting a wide variety of plants and flowers and avoid using synthetic pesticides
B. Planting Systems for a More Productive Harvest
Sometimes all it takes to make gardening a lot easy yet productive is having a good grasp of how plants behave and relate with each other.
In this section, we’ll get into smart and creative methods of planting your crops. All with the intent to maintain plant and soil health over the long term and achieve the best yield possible from the space available.
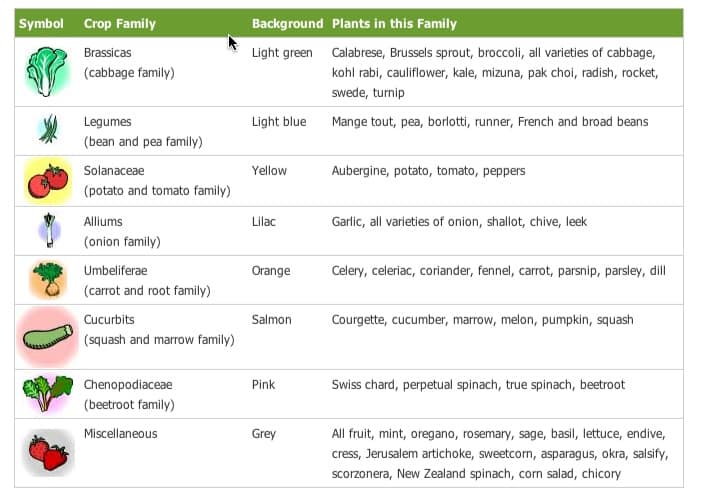
Crop Rotation
Some pests and diseases are host-specific. Cabbage loopers, for example, feed on a large variety of brassicas. If you continue to plant cabbages or any in its family over the next planting seasons, the problem on this pest persists. Plus, the same plant uses the same nutrients and minerals. If planted successively, it could result in nutrient depletion in the soil.
This is where the idea of crop rotation comes in. Gardeners plan out their crops in specific orders, taking note that the succeeding crop does not belong to the same family as the immediate past one. A 2-3 year or longer period is required in planning the rotation.
To help you plan your own rotation, here’s a useful crop rotation guide. Choose your next-season plants that belong to a different family and most preferably in the order of crop families shown in the table.
growveg.com
Companion Planting
Even plants complement each other. How? Some plants come in strong odours which serve as repellents against insects. This odour protects not only the plant itself but other crops that are prey to the same insect.
In the same way, some plants support the growth of other plants. Leafy greens, for example, can cheerfully bask in the shadow cast by corn plants, and the roots of bush beans occupy different levels in the soil as corn so they don’t compete for water and nutrients.
Here’s a list of plants that are friends and/or enemies with each other.
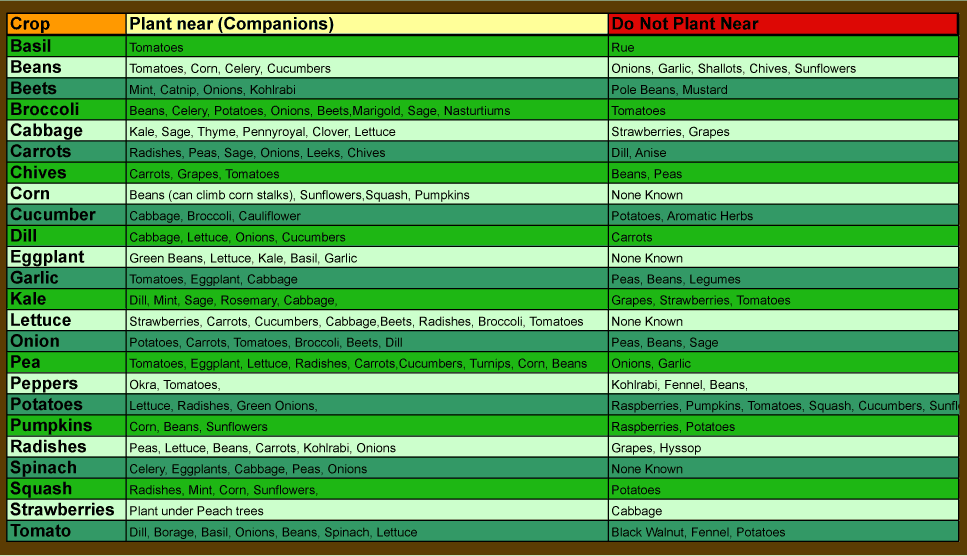
clearcreekseeds.com
Also, by learning which plant makes a good companion for which plant, you can decide with less difficulty on what to choose among the many types and varieties of fruits, vegetables, and flowers. Win-win situation.
Succession Planting
To maximise the yield in a specific area of a garden, gardeners grow different crops with different maturation or harvest season. For example, early beets and carrots are cool-weather crops that can be planted first. As it reaches maturity, warm-weather plant like melons and tomatoes are then grown. The earlier plants may have been harvested but the succeeding plants grow about half-way. This way, gardeners harvest crops all-year round.
How to do it
- Get started by making a list of what to plant, making sure that you have a good understanding of their growing habits and preferences.
- Refer to seed catalogs for instructions and information about planting a specific variety.
- Begin planting with early, quick crops followed by long-season ones.
- Take note also of plants that belong to the same family. Avoid planting them on the same area for at least 2-3 years.
- For continuous harvest, choose varieties that consistently yield over a longer period like broccoli and tomatoes.
Square Foot Gardening
As the name implies, square-foot gardening entails measuring a grid of squares over a garden bed or the use of garden box frames that is planted thickly with different varieties.
This method is best for small gardens. It makes growing in small space more bountiful, though not as large a harvest as bigger spaces.
Steps to build square foot garden
- Make a layout of squares on your bed in 4 ft x 4ft each. Provide a box built from wood, vinyl, or cinder blocks. If you plan to have more than one box, separate them to at least 3 ft for the walkway.
- Supply your box with a good weed fabric and fill it with your soil mix.
- Place a permanent grid in each box, dividing the frame into at least 16 one-foot squares.
- Plant in your favourite crops in each foot. Two or three seeds are preferable in each foot.
- Tend to your plants regularly by watering the root area only with a cup of warm water and by trimming dead leaves.
- Harvest accordingly. When a foot is emptied, add a compost into the soil and plant a new different crop.
VI. SPECIALTY GARDENS AND OTHER GARDENING CONCEPTS
Gardening is an art. It comes in forms or medium as varied and creative as the mind of many artists – the gardener. Plants may be their constant element, but garden styles and themes range from formal to customary to the most innovative.
Discover the different garden styles which reveal unique interests of gardeners all around. This styles could be your thing too.
A. Garden styles based on predominant plants and other natural elements
Woodland Gardens
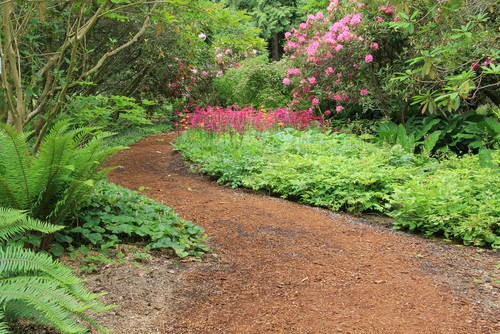
General feature:
Mimics the natural habitats of woodland plants, usually those that are native to your place.
Common plants:
Woodland plants, wildflowers like black-eyed Susan and zinnia, flowering or grassy type of annuals and perennials, and/or a mix of shrubs and herbs.
Place suited:
Cool regions; wide outdoor areas for gardening
Cottage Gardens

General feature:
Characteristically a British countryside garden in appeal. Flowers are spread out in random.
Common plants:
Annuals and perennials like cornflower, hollyhocks, and poppies; Fruits, vegetables, and herbs are also traditionally included in a cottage style garden.
Place suited:
Lawns with meandering paths, gently-curved beds, and weathered stone pavings.
Tropical Gardens

General feature:
Brings the tropic feel, complete with exotic plants, into the garden
Common plants:
Thick green foliage; vibrant flowers like geraniums, begonias, and elephant ears; palms and cycads.
Place suited:
Warm climate areas
Water Gardens
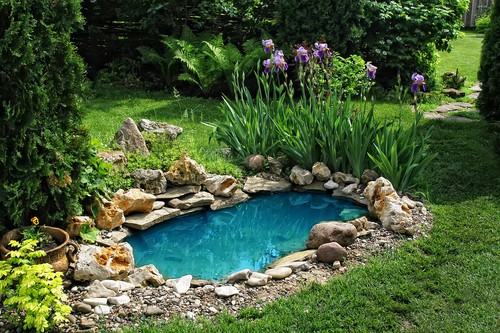
General feature:
A garden that makes use of small water ponds, streams, and fountain as their focal point. It can also imitate the look of a bog or wetland in low-lying areas or around ponds.
Common plants:
Water lilies, cattails, giant rhubarb, carnivorous plants like venus flytrap, and some woodland plants like blue-eyed grass and turtlehead.
Rock Garden
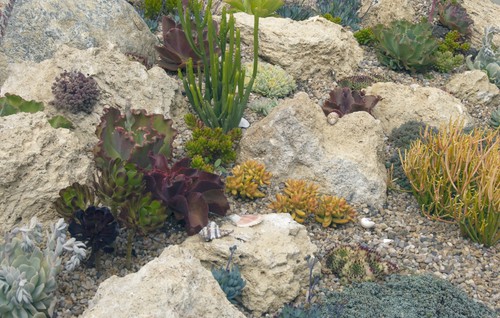
General feature:
Garden style that imitates a mountainside with rough-hewn rocks and grasses.
Common plants:
A mix of shade and sun-loving plants such as low-lying shrubs, bulbous plants, succulents, and ornamental grasses.
Place suited:
Works well in dry areas with sloped surface in the lawn
B. Garden styles based on location or space
Indoor Gardens
Why plant indoors?
When a backyard is too full of growing plants or there is no backyard at all, the indoors render a very convenient space to garden in. Plus, it allows a gardener or plant enthusiast to grow a plant when winter or heavy wind strikes outdoors.
Certain plants are proven to effectively clean the air or combat chemicals normally used at home. So plants make an environment-friendly home accessory, apart from adding natural beauty to your interiors.
General feature:
This is a gardening style that doesn’t take up much space. Usually planted in containers, indoor plants are started and grown right on top of your table, hanged on the wall, set in a shady corner of a room, or lined on a sunny windowsill or kitchen countertops.
Common plant choices:
In the kitchen – Container Vegetables like salad greens, carrots, peppers, tomatoes; and Herbs like basil, parsley, rosemary, chives
Other home interiors – Flowers like geraniums, roses, marigold, petunia; and Ornamental plants and succulents
Urban Gardens
Why garden in urban areas
Many city dwellers stressed about wanting to grow their own food just so they could abandon the costly and chemically-grown grocery foods. Urban garden is the answer.
General feature:
Gardening done in an apartment or small spaces within an urban area. Gardens are usually created on the rooftop, balconies, window boxes, or even on a slab of concrete.
Common plants:
Any container plant, vegetable or flower.
Community Garden
What is a community garden
Also known as allotment garden, community gardens are planting areas organized by a neighborhood or gardening groups to raise edible plants for the benefit of the whole community.
More than providing fresh food, community gardens foster friendship and deep bonds among neighbors or common interest groups.
General feature:
A typical allotment garden consists of several plots or garden beds assigned to individuals or families. It can be built on reclaimed lands (legalities considered) or residential building grounds. Some community gardens come in child-friendly features like a separate plot just for the kids to dig in and learn. This article from Harrow in Leaf presents a quick guide for new allotment holders.
Common plants:
Community gardens are specially allocated for edible plants.
C. Contemporary Gardening Methods
Hydroponics
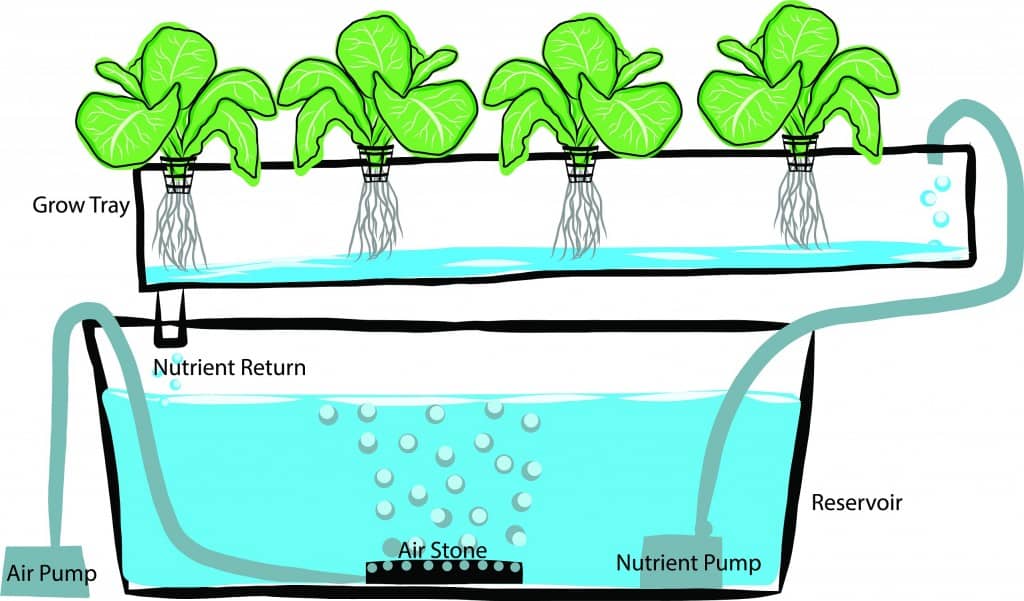
What is Hydroponics
It is the art of growing plants in water, instead of soil. Water is used to transport the nutrients and energy through different mediums and into the plant.
This method of growing plant is based on studies that water in the soil provides the minerals that plants need to grow. This lead to the thought that water alone could be used to effectively grow crops and other plants.
General feature
A hydroponic gardening system consists chiefly of water, planting medium, nutrient solution, and the plant. Each of this component is present and vital in any hydroponic method.
Growing medium serves as plant support and water retainers. It includes coconut fiber, perlite, rock wool, and starter sponge. Nutrient solution, on the other hand, is essential to provide the nutrient needs of plants. It is infused in the water.
Common plants
Vegetable and herbs that thrive in a hydroponic system are lettuce, tomato, basil, parsley, and coriander.
Aquaponics
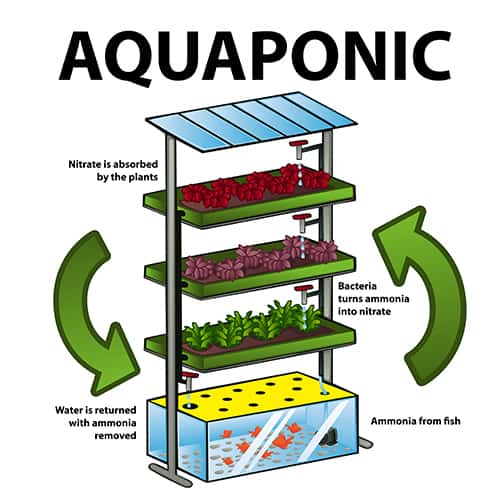
What is aquaponics
Combines the growing method of hydroponics with aquaculture or the raising of fish in one integrated system. The plants provide natural filter in the water that keeps it safe for fishes to thrive in. The fishes, in turn, produce wastes that are converted by microbes into vermicompost or organic fertiliser for the growing plants.
General feature
An aquaponic system of gardening consists of a balanced amount of water, plants, fish and fish wastes, and microbes that work in a cycle of use and reuse.
Home-level aquaponic will do well with the basic equipment as small tanks, grow trays, and pumps and drains.
Common plants
Hydroponic-thriving vegetable and herbs also do well in an aquaponic system.
Common fishes
Includes tilapia, catfish, carp, and goldfish. Fishes grown in an aquaponic system are raised primarily to provide fertiliser to plant; consuming them requires other feeding and maintenance consideration.
Resources:
http://www.americanmeadows.com/
http://www.thompson-morgan.com/
http://www.burpee.com/
http://www.planetnatural.com/
http://gardening.about.com/
https://www.nationaltrust.org.uk/
http://www.motherearthnews.com/
http://www.sustainable-gardening.com/
http://eartheasy.com/
http://www.gardenorganic.org.uk/
https://www.rhs.org.uk/
http://www.gardeningknowhow.com/
http://www.fao.org/
http://www.sparkpeople.com/
http://www.wrap.org.uk/
http://www.homecompostingmadeeasy.com/
https://pender.ces.ncsu.edu/
http://www.rodalesorganiclife.com/
http://www.usda.gov/
https://www.growveg.com/
http://www.oisat.org/
http://www.almanac.com/
http://www.melbartholomew.com/
http://www.theaquaponicsource.com/
http://www.thegarlicfarm.co.uk/growing/tips-and-advice/
William Walsworth, Gardening: Essential Beginners Guide to Gardening and Growing Organic vegetables
Nancy Ross, Gardening: The Complete Guide to Vegetable Gardening for Beginners
Ziggie Woodworth, Gardening: The Ultimate Gardening Guide Book for Organic Vegetables and Fruits with Gardening Techniques, Tools, Supplies, Tool Set, Equipment
Andy Jacobson, Hydroponics: The Essential Guide
Kaye Dennan and Jason Wright, Complete Hydroponic Gardening Book